
 No comments
Menggunakan Adobe Premiere Pro 2.0 (6 / 2006)
wal tahun ini Adobe unveiled versi terbaru dari video editing suite - sekarang disebut Adobe Studio Produksi (www.adobe.com / productionstudio). Dibangun sekitar versi baru Premiere Pro untuk video editing dan Setelah Efek untuk gerakan grafis dan efek visual , yang juga termasuk suite versi baru Encore DVD untuk DVD authoring dan profesional untuk Audition audio pencampuran dan mengedit.
 Adobe Premiere Pro 2.0 Adobe Premiere Pro 2,0
This new collection is all about full support for the broad range of video formats, from SD and DV to HDV and HD, with even better integration among the Adobe tool set, plus the bonus of a significantly improved interface. Koleksi baru ini adalah semua tentang dukungan penuh untuk berbagai format video, dari SD dan DV untuk HDV dan HD, bahkan lebih baik dengan integrasi antara Adobe alat set, plus bonus dari interface meningkat signifikan.
Since the core of our work is in the Premiere Pro editor, let's highlight some of the most exciting features in the editing process,. Karena inti dari pekerjaan kami berada di Premiere Pro editor, mari kita sorot beberapa fitur yang paling menarik dalam proses editing,.
Premiere Pro 2.0 Premiere Pro 2,0
The first thing you notice when getting started with Adobe Premiere Pro 2.0 ( www.adobe.com/products/premiere ) is the new common interface design for all the Adobe video applications, based on the consumer versions of Photoshop Elements and Premiere Elements . Instead of having you constantly fiddling with overlapping windows and floating palettes, the interface uses interlocking panels that move together and resize proportionally as you adjust their size, so there's no wasted space or partially overlapping windows. Hal pertama yang Anda perhatikan ketika memulai dengan Adobe Premiere Pro 2.0 (www.adobe.com / products / lokasi) adalah desain baru antarmuka umum untuk semua aplikasi video Adobe, berdasarkan konsumen versi Photoshop Elements dan Premiere Elements. Namun Anda selalu memiliki yang remeh tumpang tindih dengan jendela dan floating palet, antarmuka menggunakan panel interlocking yang bergerak bersama-sama dan proporsional sebagai ukuran Anda menyesuaikan ukuran mereka, sehingga tidak ada ruang-siakan atau sebagian tumpang tindih jendela. It's even easier to rearrange the layout with the new "drop zone" feature -- you can drag and drop individual windows to either be positioned as a new panel, or be nested as a tab with a group of windows in an existing panel. Akan lebih mudah untuk mengatur ulang tata letak dengan yang baru "drop zone" fitur - Anda dapat drag dan drop ke jendela individu baik akan diposisikan sebagai panel baru, atau sebagai nested tab dengan sekelompok jendela yang ada di panel.
Otherwise, the Premiere Pro interface should feel familiar and comfortable, with the same general windows and controls that you are already used to -- the Project windows to organize your assets, the Source and Program windows to view and edit your clips and sequences, the Timeline window for editing, and additional windows to access tools including Effects , Effect Controls , Audio Mixer , Info properties, and History . Jika tidak, Premiere Pro antarmuka harus merasa akrab dan nyaman, dengan jendela yang sama umum dan kontrol yang sudah digunakan untuk - Proyek jendela untuk mengatur aset, maka Sumber dan Program jendela untuk melihat dan mengedit klip dan sequence, maka Timeline jendela untuk mengedit, dan jendela tambahan untuk mengakses peralatan termasuk Efek, Efek Kontrol, Audio Mixer, Info properti, dan Sejarah.
 Premiere Pro: Interface Premiere Pro: Interface
You still can use Window > Workspace to restore the screen layout to default positions for different kinds of tasks, or to save your own favorite layouts. Anda masih dapat menggunakan Window> workspace untuk memulihkan tata letak layar ke posisi standar untuk berbagai jenis pekerjaan, atau untuk menyimpan favorit sendiri layout. And you can still drag out a tab or a window as a separate floating palette (ie, to place on a second monitor) -- just hold down Ctrl as you drag. Dan Anda masih dapat mengorek tab atau window terpisah apung sebagai palet (misalnya, untuk ditempatkan di kedua monitor) - cukup menekan Ctrl yang Anda tarik.
HD Editing HD Editing
The big improvement for editing in Premiere Pro is scalable support for the full range of major video formats, from standard definition to high-def, including DV, SD, HDV, HDCAM, D5 HD, and Windows Media Video, up to 2k and 4k resolutions (4096 x 4096). Perbaikan yang besar untuk mengedit di Premiere Pro scalable adalah dukungan penuh untuk berbagai format video yang besar, dari standar definisi tinggi-def, termasuk DV, SD, HDV, HDCAM, D5 HD, dan Windows Media Video, hingga 2k dan 4k resolusi (4096 x 4096). Premiere Pro now supports native HDV capture and editing for lower-cost HD camcorders, with no format conversion or quality loss. And for higher quality, Premiere Pro provides native pro HD-SDI support out of the box through the AJA Video Xena HS real-time encoding card. Premiere Pro sekarang mendukung asli HDV menangkap dan mengedit untuk menurunkan biaya-HD Camcorder, tanpa format konversi atau kualitas kerugian. Dan untuk lebih berkualitas, Premiere Pro menyediakan asli pro HD-SDI dukungan dari kotak melalui video AJA Xena HS-nyata waktu encoding kartu.
The capture and importing process in Premiere Pro also works as before. Penawanan dan impor dalam proses Premiere Pro juga bekerja seperti sebelumnya. Use File > Capture to bring up the Capture window to log and capture from tape. And use File > Import (or just double-click in the Project window) to import clips and a wide variety of common formats. Gunakan File> Capture untuk membuka jendela yang TANGKAP login dan ambil dari tape. Dan menggunakan File> Impor (atau klik dua kali di jendela Proyek) untuk mengimpor klip dan berbagai format umum. Then preview and trim in the Source window, and then assemble your production as sequences on the Timeline. Pratinjau dan kemudian diratakan di Sumber jendela, kemudian berkumpul anda produksi sebagai sequence pada Timeline.
 Import dialog - file formats Dialog Impor - format file
This means you can mix formats on the same timeline, for example combining DV and HDV footage at 480, 720, 1080 lines, and then edit and preview directly in Premiere Pro -- with real-time preview as possible based on the performance of your system. Hal ini berarti Anda dapat mencampur format pada waktu yang sama, misalnya menggabungkan DV dan HDV panjangnya di 480, 720, 1080 baris, dan kemudian mengedit dan melihat langsung di Premiere Pro - dengan real-time dulu mungkin berdasarkan performa sistem.
For high quality results, Premiere Pro now uses full 32-bit internal color processing, and can increase performance with GPU-accelerated rendering on new graphics cards. Berkualitas tinggi untuk hasil, Premiere Pro sekarang menggunakan penuh 32-bit warna proses internal, dan dapat meningkatkan kinerja dengan GPU-accelerated rendering pada kartu grafis baru.
Multi-Cam Editing Multi-Cam Editing
Beyond all this HD editing, however, the coolest new feature in Premiere Pro is the Multi-Cam Monitor tool for cutting together multi-camera shoots with up to four cameras. Melampaui semua ini HD mengedit Namun, fitur baru yang keren di Premiere Pro adalah Multi-Cam Monitor alat untuk pemotongan bersama-sama multi-menembak dengan kamera sampai empat kamera. What makes this so effective is the way that it naturally uses the existing facilities in Premiere Pro to help you synchronize the shots, cut them together, and then continue editing the shoot. Apa yang membuat ini sangat efektif adalah dengan cara alami yang menggunakan fasilitas yang ada di Premiere Pro untuk membantu Anda melakukan sinkronisasi dengan gambar, potong bersama mereka, kemudian lanjutkan dengan mengedit menembak.
First, stack up to four tracks from the multi-cam shoot in a Timeline. Pertama, susunan hingga empat lagu dari multi-cam menembak dalam Timeline. Use all the usual tools to lay out and preview the clips, including the Toggle Track Output (eye) icon to view each individual track. Semua yang biasa menggunakan alat untuk merencanakan dan melihat pratinjau klip, termasuk Toggle Lacak Output (mata) melihat ikon untuk setiap lagu. If needed, use the new Synchronize Clips dialog to help automatically synchronize the clips, by timecode or by markers that you have inserted, for example at a hand clap. Jika diperlukan, menggunakan Mensinkronisasi Klip dialog untuk membantu secara otomatis melakukan sinkronisasi dengan klip, oleh timecode atau tanda-tanda yang telah terpasang, misalnya dengan bertepuk tangan.
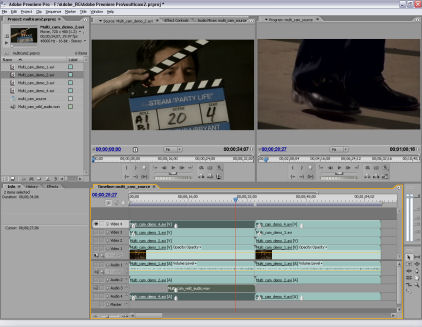 Assemble Tracks Berkumpul Trek
To use this multi-track timeline as a multi-cam source in Premiere Pro, you can take advantage of the ability to create nested timelines (called Sequences). Create a new master Sequence in the Project window, and drag the multi-track sequence into it, now nested and displayed as just one collapsed clip. Untuk menggunakan multi-track timeline sebagai multi-cam sumber di Premiere Pro, Anda dapat mengambil keuntungan dari kemampuan membuat nested waktu (disebut sequences). Buat baru master di urutan Proyek jendela, dan tarik multi-track urutan ke dalamnya, dan sekarang muncul sebagai nested hanya satu klip roboh. Now here's the magic: right-click and select Multi-Camera > Enable to tell Premiere Pro to treat this sequence as a multi-cam source. Now here's the magic: klik-kanan dan pilih Multi-Kamera> Aktifkan kirim ke Premiere Pro untuk merawat urutan ini sebagai multi-cam sumber.
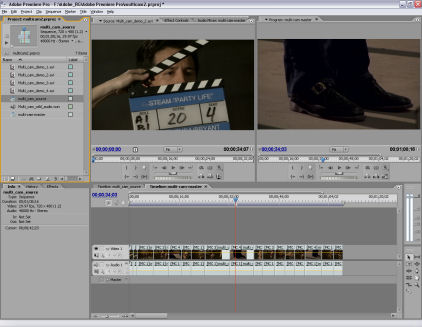
To then cut between the multiple camera clips, click the flyout menu in the Program monitor to display the Multi-Camera Monitor view. Untuk kemudian dipotong antara beberapa kamera klip, klik menu di flyout Program memantau untuk menampilkan Multi-Camera Monitor melihat. Premiere then displays the new Multi-Camera window, showing the up to four sources on the left, with the currently-selected track outlined and displayed as the output on the right. Premiere baru kemudian menampilkan Multi-Camera jendela, menunjukkan hingga empat sumber di sebelah kiri, dengan yang sedang dipilih-lagu yang dijelaskan dan ditampilkan sebagai output di sebelah kanan. To then edit the shoot, start playback to view the multiple tracks playing in parallel, and then dynamically switch between the views by clicking on the sources (or pressing the numeric keys). Untuk kemudian edit tunas, mulai pemutaran untuk melihat beberapa lagu diputar secara paralel, kemudian beralih secara dinamis antara dilihat dengan mengklik sumber (atau menekan tombol angka).
 Multi-Cam Editing Multi-Cam Editing
After you finish recording, the track in the Timeline shows cuts at each edit point, just like any other editing. Setelah Anda selesai merekam, trek dalam Timeline menunjukkan luka di setiap titik mengedit, seperti pengeditan lainnya. You can continue reviewing and refining the edit using the Multi-Camera Monitor, changing the cut points and source camera. And you can precisely edit the shoot directly in the Timeline, using the standard tools to adjust edit points (roll, ripple, slip, slide), and even using the right-click menu to change the multi-cam source track. Anda dapat memeriksa dan memperbaiki yang mengedit dengan menggunakan Multi-Camera Monitor, mengubah dan memotong poin sumber kamera. Anda juga dapat mengedit tepat menembak langsung dalam Timeline, menggunakan alat-alat standar untuk menyesuaikan mengedit poin (roll, ripple, slip, slide), dan bahkan menggunakan menu klik kanan untuk mengubah multi-cam melacak sumber.
 Multi-track Sequence Multi-track Sequence
DVD Creation DVD Creation
When you've finished editing your production, Premiere Pro now supports full DVD creation support right from the timeline. Bila telah selesai mengedit produksi, Premiere Pro sekarang mendukung penuh DVD penciptaan dukungan langsung dari garis waktu. As first used in Premiere Elements, you can create either an auto-play DVD with no menus, or a DVD with chapter menus for your clips, based on customized template designs. Seperti yang pertama digunakan dalam Premiere Elements, Anda dapat membuat salah satu yang secara otomatis memutar DVD tanpa menu, atau menu DVD dengan bab untuk klip, berdasarkan desain template kustom.
For an auto-play DVD, you can place DVD markers in the Timeline for chapter points, or use Auto-Generate to insert markers at edit points, or at regular time intervals, or evenly along the length of the sequence. Untuk secara otomatis memutar DVD, Anda dapat DVD tanda dalam Timeline untuk bab poin, atau gunakan Auto-Menghasilkan untuk memasukkan tanda-tanda di poin mengedit, atau pada waktu interval reguler, atau merata sepanjang panjang urutan. Then use Window > DVD Layout to Preview and then Burn the DVD. Kemudian gunakan Window> DVD Layout Pratinjau untuk kemudian Burn DVD. Actually, you can burn directly to Disc, or to a Folder on hard disk to play with a software player, or to an ISO Image file to burn copies later (ie, with Encore DVD). Sebenarnya, Anda dapat langsung ke Disc membakar, atau ke folder pada hard disk untuk bermain dengan software player, atau ke sebuah file ISO Image untuk membakar salinan nanti (yaitu, dengan Encore DVD).
 Burn DVD Burn DVD
For a menued DVD, use the DVD Layout window to choose a template graphical design. Untuk menued DVD, menggunakan DVD Layout jendela untuk memilih template desain grafis. Adobe provides a pair of menus for each design, for the main menu and any scene menus, or you can create your own -- these are just Photoshop PSD files with special layer names, as used in Encore DVD. Adobe menyediakan sepasang menu untuk masing-masing desain, untuk menu utama dan tempat menu, atau anda dapat membuat sendiri - ini hanyalah Photoshop PSD file dengan nama lapisan khusus, seperti yang digunakan dalam Encore DVD.
 DVD Templates DVD Template
You then can customize the selected template by clicking in the DVD Layout window to reposition the elements and edit the text. Anda kemudian dapat menyesuaikan template yang dipilih dengan mengklik pada jendela untuk DVD Layout reposition elemen dan mengedit teks. Finally, preview and burn your disc. Akhirnya, pratinjau dan membakar disk Anda.
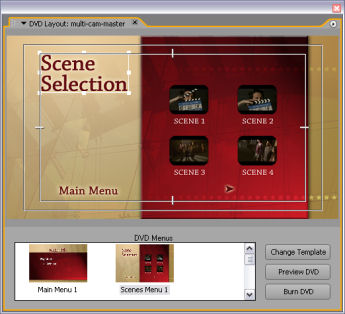 DVD Layout DVD Layout
Besides creating a DVD with a scene menu to jump to each chapter point, Premiere Pro also provides the ability to create a disc with multiple movies, each with its own scene menu and chapter points. Selain membuat DVD dengan pemandangan menu untuk beralih ke setiap bab titik, Premiere Pro juga menyediakan kemampuan untuk membuat sebuah disk dengan beberapa film, masing-masing memiliki pemandangan menu dan bab poin. To do this, change the DVD Markers in the Timeline to mark the start of each separate movie with a Main Menu marker, and the end as a Stop marker. Untuk melakukan hal ini, mengubah DVD tanda di Timeline yang menandai dimulainya terpisah setiap film dengan Menu Utama tanda, dan pada akhir sebagai tanda Berhenti. You can do this in the Effect Controls window as you work in the DVD Layout window, or directly in the Timeline. Anda dapat melakukannya di Efek Kontrol jendela saat Anda bekerja di DVD Layout jendela, atau langsung di dalam Timeline.
Production Studio Studio Produksi
Of course, there's a lot more that's new and interesting in Premiere Pro 2.0, but the idea here has been to highlight some of the more visible and exciting new features, and show you how they integrate into the applications that you may already be familiar with. Tentu saja, ada lebih banyak yang baru dan menarik di Premiere Pro 2.0, namun ide disini telah untuk beberapa terlihat lebih menarik dan fitur-fitur baru, dan menunjukkan cara mereka integrasikan ke dalam aplikasi yang mungkin sudah akrab dengan .
Adobe has worked hard to bring its video applications together with a new look, common interface design, and cross-application integration for moving quickly and naturally between the different tools for different kinds of media. The applications are more powerful, more responsive, more flexible, and more mature. Adobe telah bekerja keras untuk membawa bersama-sama dengan aplikasi video dengan tampilan baru, umum desain antarmuka, dan lintas-integrasi aplikasi untuk bergerak dengan cepat dan alami antara berbagai peralatan untuk berbagai jenis media. Aplikasi yang lebih canggih, lebih responsif, lebih fleksibel , dan lebih dewasa. Which also makes them more fun to use. Yang juga membuat mereka lebih menyenangkan untuk digunakan.
So check them out for yourself -- the Adobe website offers tryout versions of Premiere Pro 2.0, Encore DVD 2.0, and other applications that you can download and experiment with for 30 days. So check them out for yourself - Adobe situs menawarkan tryout versi Premiere Pro 2.0, Encore DVD 2.0, dan aplikasi lain yang dapat Anda download dan dengan percobaan selama 30 hari. Also check the site for updates, tutorials, support forums, downloads, and other free resources. Juga situs untuk memeriksa pembaruan, tutorial, dukungan forum, download, gratis dan sumber daya lainnya.
Production Studio Versions Versi produksi Studio
The Standard edition of Production Studio at $1,199 (estimated street price) includes Premiere Pro 2.0 and After Effects 7.0 Standard for video editing and effects, plus the latest version of Photoshop CS2. Standar edisi Studio Produksi di $ 1,199 (perkiraan harga jalanan) termasuk Premiere Pro 2.0 dan Efek Setelah 7,0 standar untuk video editing dan efek, ditambah versi terbaru Photoshop CS2. The Studio also includes the Adobe Bridge media organizer and viewer (which is shipped with each individual application), and the Adobe Dynamic Link function to use After Effects compositions directly in Premiere Pro and Encore DVD (available only as part of the Studio). Studio yang juga menyertakan Adobe Bridge media viewer dan organizer (yang dikirimkan dengan masing-masing aplikasi), dan Adobe Dynamic Link untuk menggunakan fungsi Setelah Efek Komposisi langsung di Premiere Pro dan Encore DVD (hanya tersedia sebagai bagian dari Studio).
While you can do a lot with Premiere's built-in audio editing and enhanced DVD authoring capabilities, you can also step up to the Premium edition at $1,699, with full After Effects 7.0 Professional, plus Audition 2.0 and Encore DVD 2.0 for more advanced work, plus Illustrator CS2. Meskipun Anda dapat melakukan banyak dengan Premiere's built-in editing audio dan meningkatkan kemampuan DVD authoring, Anda juga dapat naik ke edisi Premium di $ 1699, dengan penuh Setelah 7,0 Efek Profesional, plus Audition 2.0 dan Encore DVD 2,0 lebih maju untuk bekerja, plus Illustrator CS2.
Adobe also offers a new Video Bundle, with the full Production Studio plus Macromedia Flash Professional 8, for $2,099. Adobe juga menawarkan video Bundle baru, dengan penuh Produksi Studio plus Macromedia Flash Professional 8, untuk $ 2099.
0 comments:
Posting Komentar